 Loading... Please wait...
Installations
How to determine Shutter Hardware Offsets and Installation Type
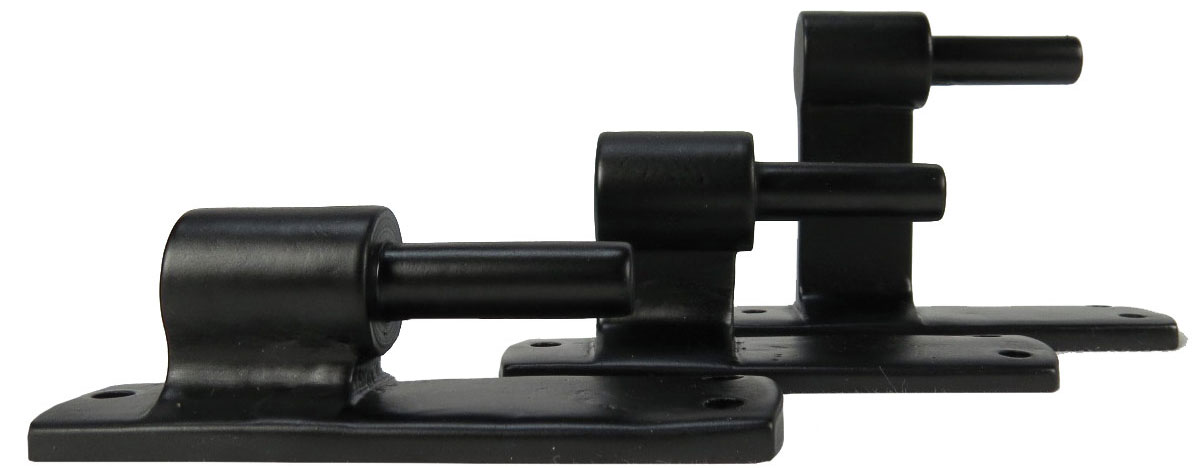
The first step in determining the correct Shutter Offset is to determine what Shutter Hardware you need and what functions you want out of them. The Shutter Hardware we will be discussing in this article are two seperate pieces: The Shutter Pintle and the Shutter Strap. The pintle is the piece of hardware that you would mount to your house/wall/window frame that the shutter strap is connected to via a extended post. You can see pictures of both below:
 |
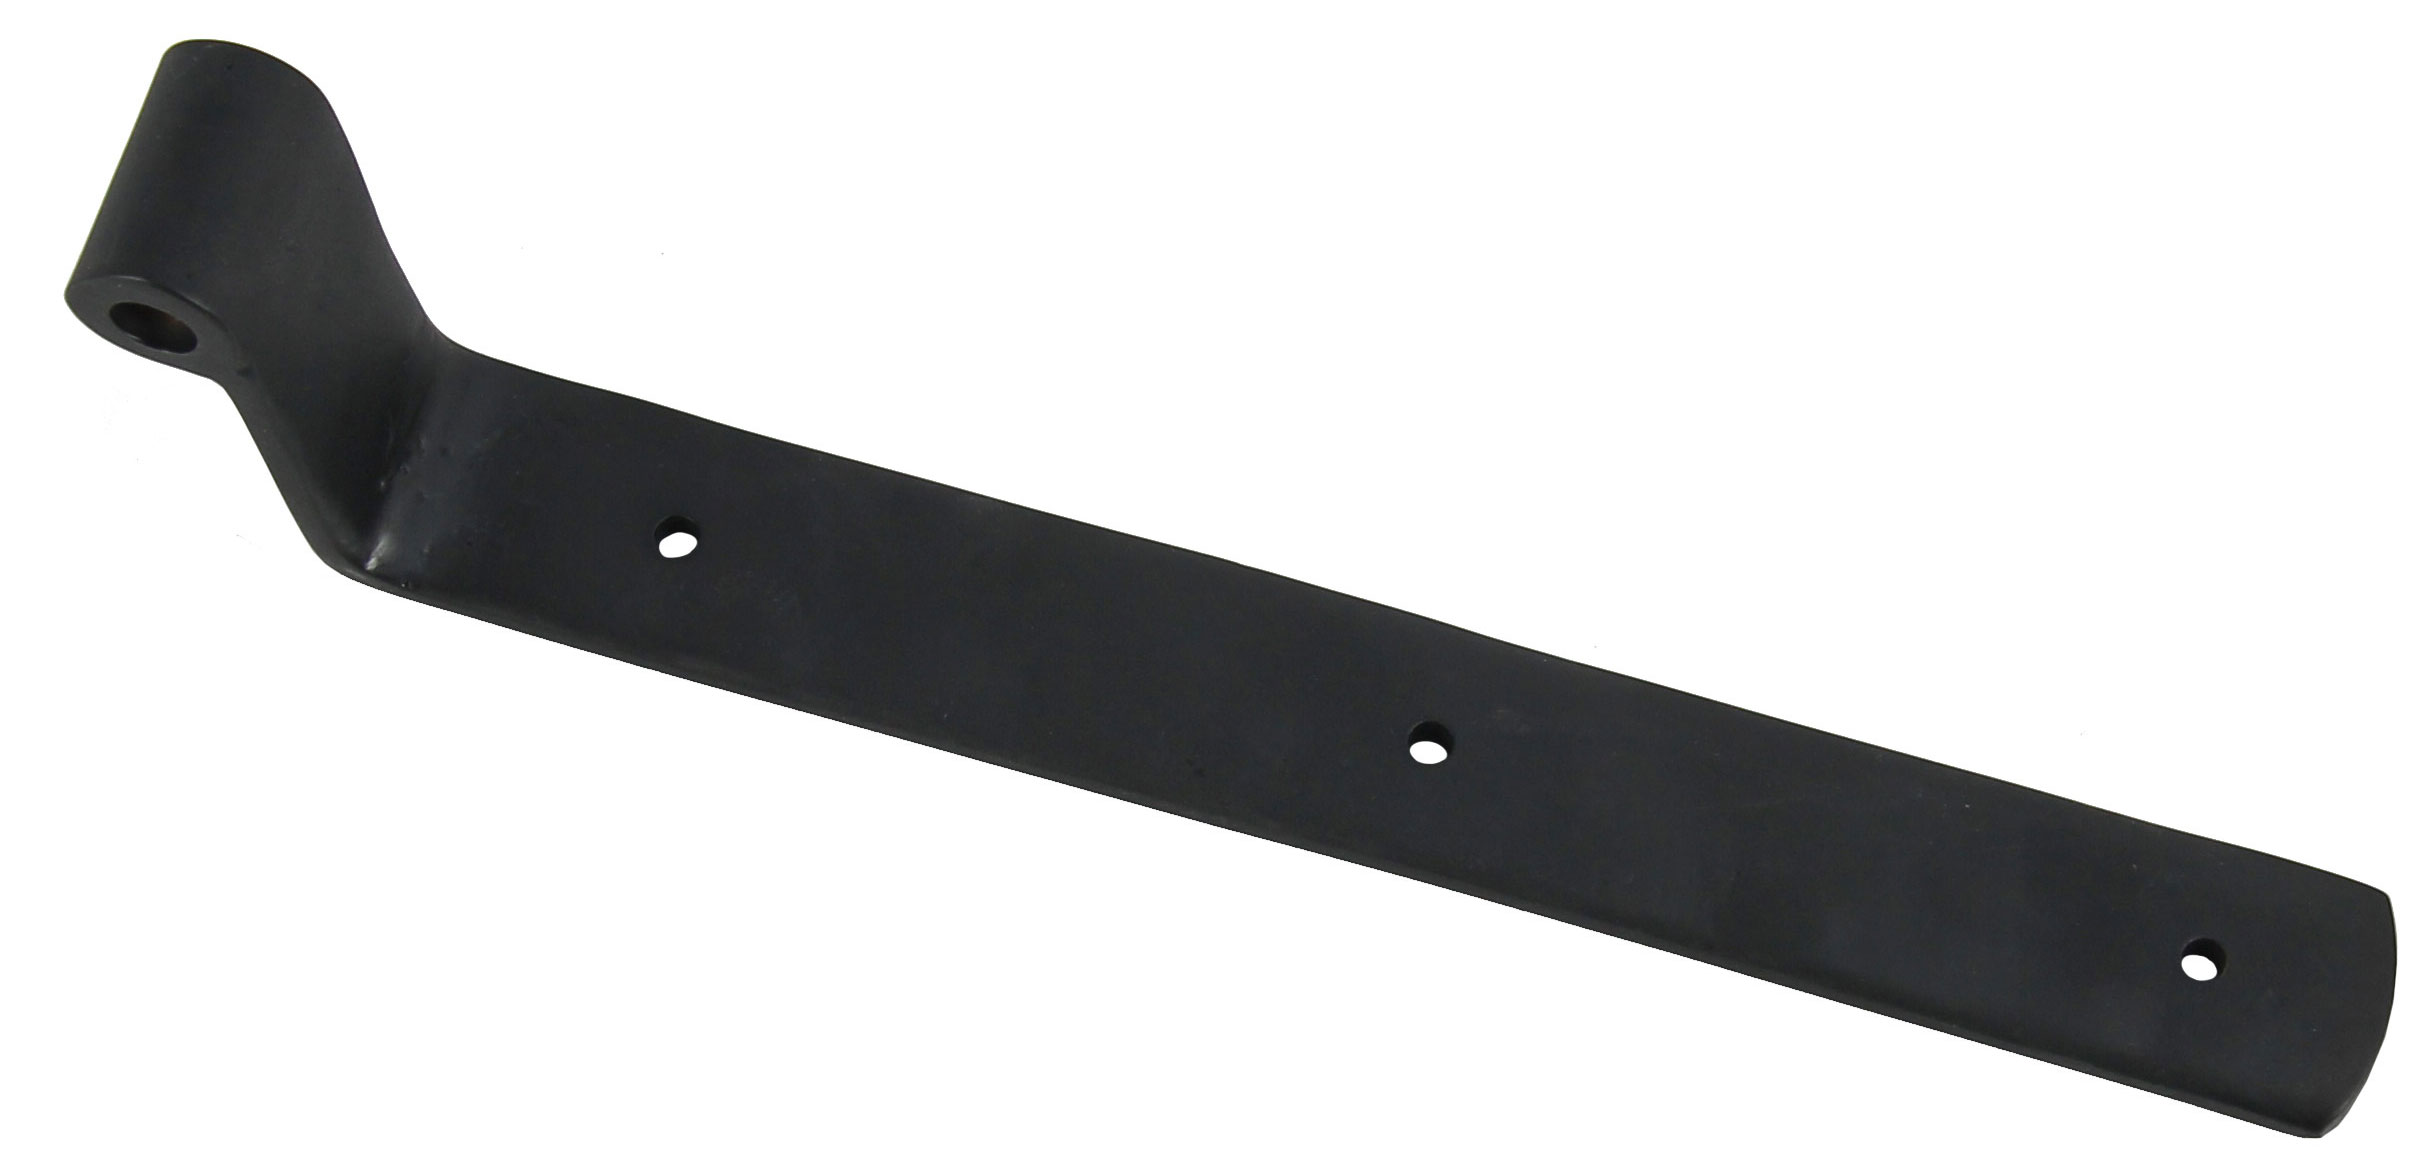 |
| Shutter Pintles (3 Different Offsets shown) | Shutter Strap (1 Offset shown) |
For one complete shutter, at minimum, you need 2 Pintles and 2 Shutter Straps. For larger, heavier shutters, you would add an extra Pintle and Shutter Strap in the middle for support if desired.
Now that you know what Pintles and Straps are, let's talk about Offsets. Offsets are the distance from the base of the Pintle or Shutter Strap, to the middle of the post (for Pintles) or the middle of the cylindrical opening in the Shutter Strap. In the above picture you can see 3 different Offsets in the Pintle picture. The Offsets for those products are as follows: First is the 3/4", second is 1-1/4", and the third is 2-1/4". The Shutter Strap Offset shown is 1-1/4".
If you were to pair these products together for a normal installation you would pair the 1-1/4" Offset Pintle with the 1-1/4" Shutter Strap. However, depending on the installation type, it may change. Below we will discuss how to determine which installation you will have and how to choose the correct offsets.
When you are selecting the correct Shutter Hardware, you will need to remember some basic rules:
- The offset of the Pintle and the offset of the Shutter Strap combined together gives you your Total Throw amount.
- Total Throw is the extension from the closed position of the Shutter Strap to the back of the open position of the Shutter Strap.
- When determining placement of Pintles & Straps, always leave a 1/2" gap between the Shutter, the installed surface, and the window. This allows airflow and ventiliation preventing mold and damage from arising due to moisture or other objects.
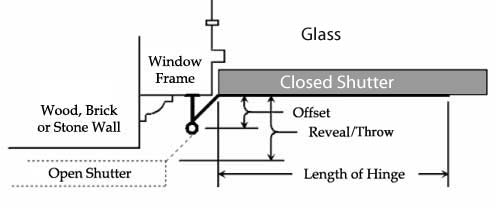
Now that we have a few terms explained, let's take a look at the above image. You can see the Total Throw, Offset, and a rough recreation of a common Shutter installation. This is a picture of a Recessed Mount. Below, I will discuss the different Mount types, but for now make sure you have a good idea of what your window looks like and how you would like the hardware to be viewed or used.
Let's take a look at your different installation options to help:
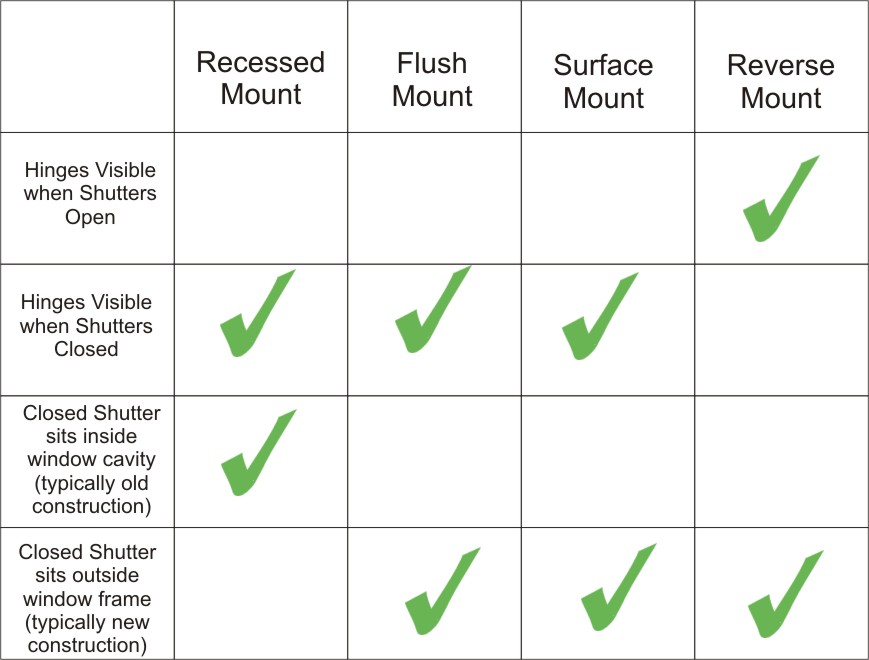
In the above table you can see basic descriptions and options of the different types. Recessed Mount is by far the most common as many houses that use Shutters are usually older and were created with this type of mount in mind. However, your house may be different or maybe you simply want a different look for your house so let's go through the different types.
First up is the Recessed Mount:
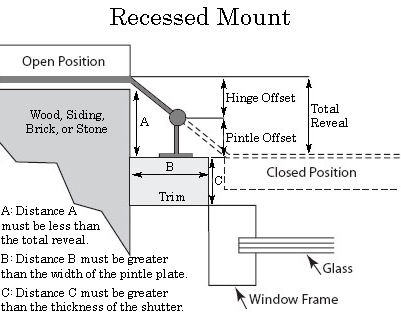
This type of Shutter Mount has the shutter sitting inside the window frame or window cavity when closed. In this case, the Shutter Pintle is installed on the Trim piece (Item B).
Make sure that your Frame or Trim piece has enough width to support the installed Pintle. In most cases the Trim piece will be elevated or Proud of the window frame/window. You can see this distance from the Window Frame to the edge of the Trim piece in (Item C) in the above image.
To allow the shutter to line up with the Trim piece when in the Closed Position, the Pintle Offset, and the Strap Offset must be the same. If they are different you may have trouble closing the shutter or keeping the open and closed positions straight. However, when determining the Offset you must measure the distance between the Trim (Item B) and your wall (Item A). This is because if your Total Throw (or Reveal as shown in the above picture) is less than (Item A), your shutter will not be able to open fully and may become damaged from impact with the wall.
Let's try an example: Let's assume you have the above Window and you want to determine your offset. First let's get the measurement of (Item A). In this case, we will say (Item A) is 1-1/4". Second, we need the thickness of your Shutter, we will say it is 1-1/2" thick, and lastly we need to know (Item C), in this case we will say it is 2". So first off, because the Shutter Thickness (1-1/2") is less than (Item C) (2") we know that the shutter will fit without hitting the frame/window when closed.
We will also assume your Trim piece (Item B) is large enough to support all of the hardware. So, because we want our shutter to sit flush with the Trim piece (Item B) when closed, our Pintle and Shutter Offsets should both be 3/4". These mactching offsets will even out when closed. This will also give us a Total Throw of 1-1/2" (3/4" Pintle Offset + 3/4" Shutter Offset) which is more than enough to rise above the distance (Item A) (1-1/4") from the Trim piece and the wall, brick, or stone as shown in the image.
Next up is the Flush Mount:
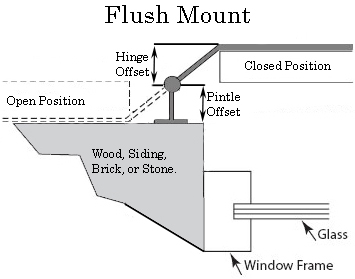
NOTE: Because the Shutter Hardware is outward facing, you must use Reverse Texture Shutter Straps for Flush Mounting. Also, because the Shutter Pintle is exposed and the Shutter Strap is not shown when open, it can be easily damaged by impacting with the wall through wind or storms. A cabin hook or shutter dog can help fix this issue by keeping it from swinging free.
Compared with the Recessed Mount, this mounting style is extremely simple. This mount is usually used on newer construction where either the frame isn't large enough to support a shutter or there is no Trim piece and so the Shutter Hardare is installed directly on the surface of the wall, brick, or stone.
The way to determine the offset for this Mount is extremely easy. It is advised that you use matching offsets (the same Offset for both the Pintle and the Strap) however, as long as the Shutter Offset is less than or equal to the Pintle Offset, any Shutter Offset can be used. As an example, if your Pintle Offset was 2-1/4", you could use either 2-1/4", 1-1/4", or 3/4" offsets for your Shutter Strap. If you decided to use the 2-1/4" Offset for your Shutter Strap, it would then sit flush with your wall. If you decided to use 1-1/4" or 3/4" offsets, then your shutter would be floating off the wall in the open position.
With this type of mount, your Shutter Hardware is only displayed when the shutter is in the closed position. Take this into account if you would like to display your hardware in the open position.
Next up is the Surface Mount:
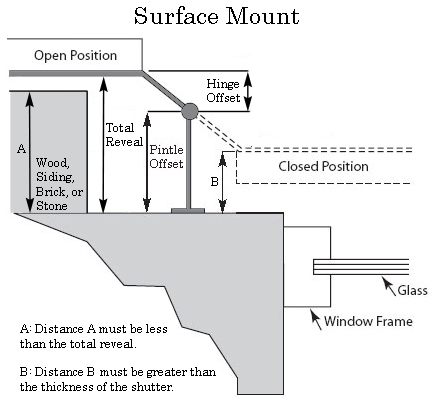
This Mounting type is special in that it is commonly used in Hurricane Shutter installs and is used when there is no Trim piece, but instead the window is inset into the building. It also has two different options for installation.
Option (1):
In this case, determining the correct offset is a bit easier than the Recessed Mount . First you need to measure (Item A) and the thickness of your shutter. Let's say that (Item A) is 2" and Shutter Thickness is 1-3/4". First we need to make sure our Total Throw (or Reveal) is larger than (Item A) 2" and that in the closed position our Shutter won't impact the surface it is installed on. So because our shutter is 1-3/4" thick, (Item B) must be greater than that. Because of this our Pintle Offset should be 2-1/4". This allows us to clear the distance of (Item A) and gives us room to keep the Shutter from hitting the installed surface where the Pintle is located.
Now that we have our Pintle Offset, we need to determine our Shutter Offset. Because our Pintle Offset is 2-1/4", we must use a 0" Shutter Offset. If we used a 3/4" Shutter Offset (or higher), this would create a Total Throw (or Reveal) of 3", which is enough to clear (Item A) 2" but the Shutter would now impact the surface it was mounted on. This can be determined by adding the Shutter Offset of 3/4" to the Shutter Thickness 1-3/4" = 2-1/2" Total which is more than the total height of the Pintle, meaning the shutter will hit the wall and will not be able to close.
So by using a 0" offset, we get: Shutter Offset 0" + Shutter Thickness 1-3/4" = 1-3/4" Total which is less than the 2-1/4" Offset of our Pintle. This means the shutter will float roughly 1/2" above the surface where the Pintle is installed.
This type of Mount will always have a higher Pintle Offset than Shutter Offset. This is because the shutter hardware is on the outside of the closed Shutter position, requiring more height to allow room for the Shutter to fit betweem it and the window.
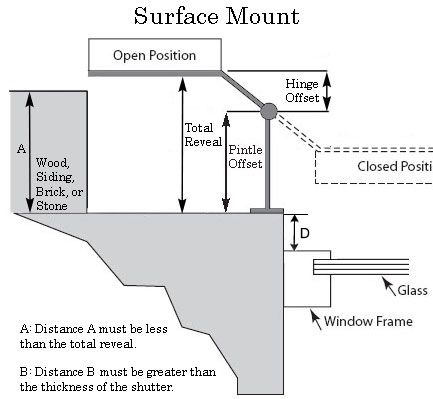
(Note: In this image I have added (Item D) to help visualize the measurement. It is an estimation and not to scale of the example below)
Option (2):
With option 2, you only need to worry about 3 measurements, (Item A), the thickness of your Shutter, and the distance from your Pintle and your Window or Window Frame (I will call this (Item D)). This option has the shutter directly over the window frame or window. This assumes you mount your pintle on the exact edge next to the Window, and not recessed like Option 1.
Basically, as long as your Total Offset (or Reveal) is greater than (Item A) and your Shutter Offset(if greater than Pintle Offset) + Shutter Thickness is less than the distance from the base of the Pintle to Window or Window Frame (Item D), your shutter will work properly.
An example would go like this: First (Item A) will be 2" for this. Second, let's say you want at least a 1" distance from your Shutter (closed position) to your Window. We will say that the distance from the Window to where the Pintle is installed is roughly 3" (Item D). Our shutter will be 1-1/2" thick.
So, first your Total Offset must be greater than (Item A) or 2". So in this case, we will use a Pintle Offset of 1-1/4". Now, because we need a Total Offset (or Reveal) of 2" or greater, our Shutter Offset must be 1" or larger (1-1/4" Pintle Offset + 1" Shutter Offset or greater = 2-1/4" minimum Total Throw), so we will use a matching Shutter Offset of 1-1/4". This gives us a Total Offset (or Reveal) of 2-1/2" which is perfect since we needed a number greater than (Item A) or 2". Now that we know our shutter can open fully, we need to make sure it won't hit the window it rests above when closed.
Because the Pintle Offset and Shutter Offset are the same, the Shutter Strap when closed will be flush with the surface it is installed on. Because it is sitting flush with the frame, that means however thick the Shutter is, it will project in that far toward the window. Because the distance from the Window to the Base of the Pintle is 3" (Item D) and our Shutter is 1-1/2" thick, we will have roughly 1-1/2" (3" of space - 1-1/2" Shutter Thickness = 1-1/2") of space between the closed Shutter and the Window.
This perfect because we wanted 1" or more of space and we have 1-1/2". If you wanted less space between the Shutter and Window, you could increase the Shutter Offset up to 2-1/4" (3-1/2" Total Offset (or Reveal)) and you would still have 1/2" of space between your Shutter and your Window.
It all depends on how close you want them to be.
Last up we have the Reverse Mount:
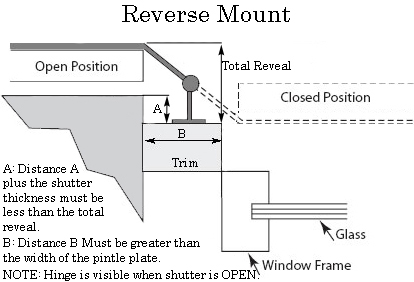
This mount is mainly used for when you have your Shutters open most of the time and you want to display your Shutter Hardware instead of having it behind the shutter as with the other mounts.
Because the Shutter is facing backwards towards the wall, the Total Offset (or Reveal) must give the Shutter enough room so that it doesn't impact the wall when open. Also because the Shutter is facing outward when closed, you don't need to worry about your Shutter impacting your window or frame.
As before your Trim piece must be large enough to have the Pintle mounted. To determine the hardware offsets you need, first you will need the thickness of your Shutter and (Item A) or the distance from the Trim piece to the edge of the exterior wall, brick, or stone.
For example: Let's say that your Shutter is 1-1/2" Thick, (Item A) is 1" and you want your Shutter roughly 1/2" from the wall when opened.
This means we need a Total Offset (or Reveal) of roughly 3". (Shutter Thickness (1-1/2") + (Item A) 1" + desired distance from wall (1/2") = 3" Total Offset
So in this case, it would be easiest to have matching Offsets to keep the Shutter Strap flush with the Pintle base. So because we need a 3" or greater Total Offset, Matching Offsets of 1-1/4" wouldn't work because then the Total Offset would only be 2-1/2". So in this case we will use a Pintle Offset of 2-1/4" and a Strap Offset of 2-1/4" which will give us a Total Offset (or Reveal) of 4-1/2" (2-1/4" + 2-1/4" = 4-1/2").
This Total Offset will allow our Shutter, in the open position, to have roughly a 2" space between the Shutter and the wall, brick, or stone. If so desired, you don't need to use Matching Offsets, and you could use a 1-1/4" Strap Offset. This would allow a space of roughly 1" between Shutter and wall, stone, or brick. (2-1/4" Pintle Offset + 1-1/4" Strap Offset = 3-1/2" Total Offset which is greater than the required 3" Total Offset) In this case however, your Shutter Strap will not sit flush and will be rasied a bit off the installed surface.
All the different mounts can be downloaded in PDF form below, simply click on the type of Mount to download a PDF version of it:
Recessed Mount | Flush Mount | Surface Mount (Both Options) | Reverse Mount
